
The piano covers more of the spectrum than almost anything else you’ll mix: fundamentals from 27 Hz, harmonics well past 4 kHz, and a dynamic range to match. That’s why it fights the bass, the vocal and the guitars all at once.
This walkthrough EQs a piano loop in Ableton Live with stock plugins only, first solo and then against a bass track, so you can hear each cut earn its place. If you’re still learning the chords underneath the sound, our piano chords chart is the companion piece.
SIDENOTE: For this tutorial, we will be using Ableton Live with stock effects and plugins only.
The Sample
The piano sample we will be using in this tutorial is from Splice, a simple chord progression.
We will be working with the sample in solo, then with some bass to get a better idea of how different EQ choices will help the piano fit in a mix better. This is what we will be getting the sample to sound like after EQ’ing:
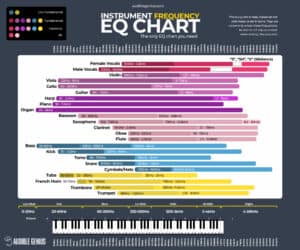
Free Download: EQ Frequency Chart Poster
Every instrument’s frequency range on one colour-coded chart. Print it, pin it above your monitors, and stop guessing where to cut.
How to EQ Piano?
Subtractive EQ
When EQ’ing an instrument, it is important to first start with removing frequencies rather than boosting them. That way, you can then add some compression to tighten the sound after you’ve cleaned it up a little, and then boost with another EQ after the compression.
Getting rid of the unwanted rumble in the sub 50 hz region with a high pass is a good first move with piano, then moving the high pass slightly higher to taste.
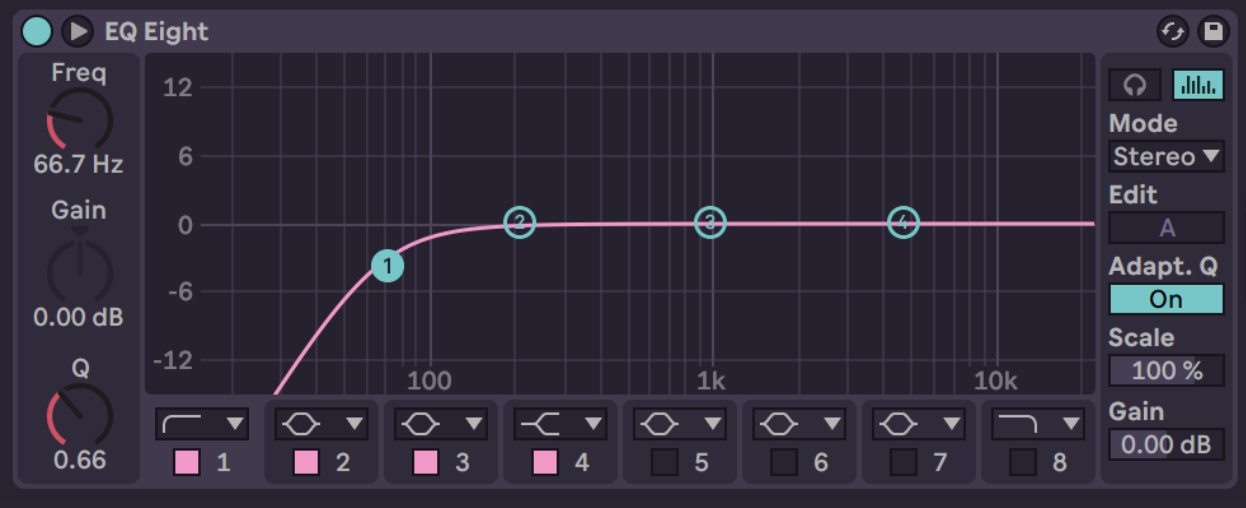
If you are mixing piano on its own with an accompanying instrument such as a vocal, it’s a good idea to leave sub-bass frequencies in on the piano, as there won’t be any other instruments competing for the sub-bass frequencies if it is just piano and vocal.
If there are other instruments in the sub-bass range however, such as a bass, bass guitar etc. then you will need to find the frequencies of where your bass sits and cut the piano at those frequencies to give the bass room.
The sample has some muddy frequencies between 100 Hz to 250 Hz, so I’ve put a wide 3.6db cut in this area, which has tightened up the overall sound quite a lot without losing the warmness of the piano. I also added a narrow cut at 770 hz to tame the low mids.
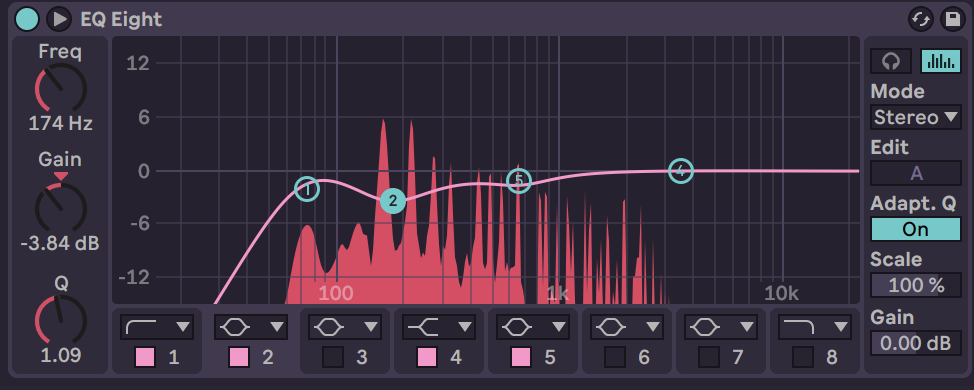
Let’s hear what we’ve got so far:
Piano without EQ
Piano with EQ
Now, let’s boost some frequencies!
Additive EQ
Since this is an EQ-only tutorial, we won’t be compressing like I usually would here. Instead, we will be boosting frequencies to enhance the sound and add some richness to this piano sample.
This piano sound is quite dark and warm, so a boost in the mids will help add some clarity and presence to the sample. Mid-range boosts are common with piano, but don’t overdo it as it can get piercing on the ears quite easily!
Also common with piano EQ is adding a high shelf in the frequencies above 5 kHz to give the piano some sparkle or “air”. I have boosted the mids at 2 Khz quite widely by 3db and added a big high shelf of 5db at 5 Khz to give this dark sample a lot more brightness.
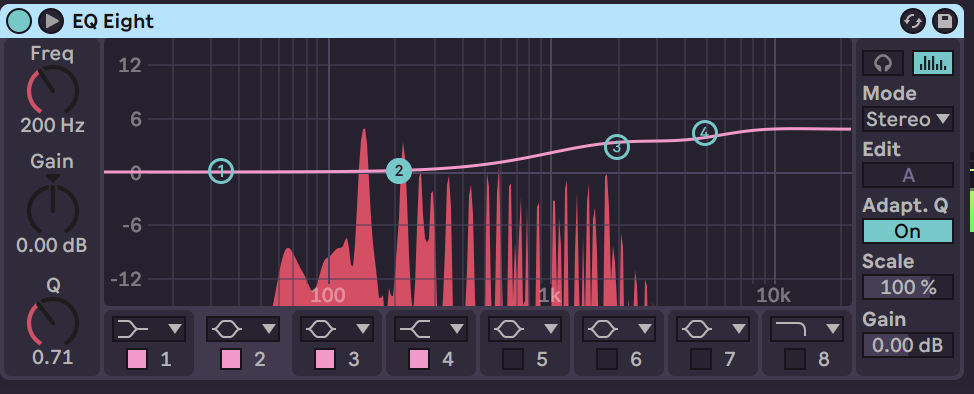
Let’s listen to the sample before and after the additive EQ:
Piano without boosts
Piano with boosts
What you boost at this stage of EQ’ing can be very much personal preference. The current sound we have in this article is quite bright and would suit a pop mix for example.
A darker sound without any of the boosts, however, would fit a warmer sound more influenced by hip-hop.
EQ’ing With Bass
When mixing piano with bass, we need to find where the bass frequency sits and then cut that out of the piano. In a mix, the bass often is in charge of the low end, and the piano sits on the low mids and mid-range. When done correctly, a mix can sound very full with these two instruments.
After using a notch EQ to find resonance in the bass above 50 Hz at 80 Hz, I added a narrow cut of 4DB on the piano at 80Hz. With this cut, the feeling of the low end of the bass cuts through the piano, and they layer on top of each other quite well.
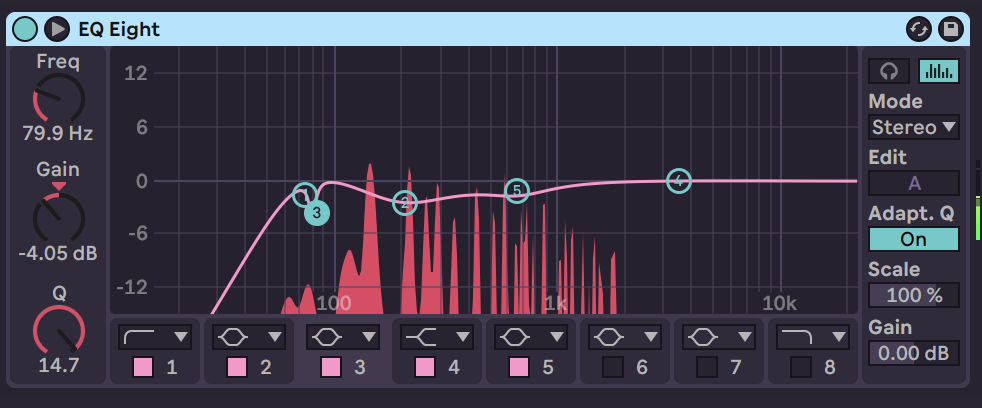
Let’s listen to the bass and piano with and without the 80 hz cut:
No 80 hz cut
80hz cut
Now, onto other EQ’ing pianos and other mid-range instruments
EQ’ing with other mid-range Instruments
Similarly to mixing bass, you will need to prioritize sometimes which sound occupies a frequency more than another, for example, vocal and piano.
Both have the potential to clash in the 1-5 kHz range and higher. Cutting the piano in this area if the vocal is the priority is a good way to solve this, or vice versa if the piano is the focus of the track.
Always EQ in the context of your track, if it’s a bass-heavy track, the piano will be focused in the mids. If the vocal is the focus, make sure the piano isn’t clashing with it in the mids. Or, if it’s just piano and vocal, make sure the piano sound isn’t thin and lacking in the low end.
Piano EQ Cheat Sheet
Everything above was one sample in one arrangement. When you open a piano track you have not mixed before, it helps to know which regions usually need attention. Treat the ranges below as places to start listening, not settings to dial in.
As a rough map: 60-80 Hz carries fullness, 100-200 Hz is where boom lives, 1.5-2.5 kHz turns honky, and 2.5-5 kHz holds most of the presence. Those regions overlap, and the same frequency can help one piano and hurt the next.
Upright Piano
- Below 250 Hz – Mud and warmth share this range. High-pass under 70 Hz when the piano is competing with a bass or a kick, and leave more low end in when the arrangement is sparse. A small lift around 80-120 Hz fills the sound out, and 150-250 Hz adds warmth.
- 250-500 Hz – Where boxiness lives. A cut here is the usual fix for a piano that sounds thick rather than crisp, but take too much and it loses its weight.
- 2-3 kHz – Dipping this range moves the piano out of the way of guitars and vocals. It costs the piano some presence, so do it when another part needs the space, or when the piano itself sounds hard.
- 5-9 kHz – Attack and clarity. Boost wide rather than narrow here, and stop before the hammers start to click.
- 9-20 kHz – The sharp top of an upright. A lift around 10-11 kHz opens it up, and a cut around 14-15 kHz stops it turning brittle. Both moves depend on the recording, so sweep before you commit.
Electric Piano
- Below 250 Hz – High-pass under 50 Hz unless the patch has deliberate sub content. 100-250 Hz is where electric pianos boom and mask the bass.
- 800 Hz to 1 kHz – The usual problem area. Sweep a narrow cut through it and you will often find one honky frequency doing most of the damage.
- 1.5-3 kHz – Where an electric piano gets its bite. A wide boost between 1.5 and 2.5 kHz brings it forward, and a cut softens a harsh patch or makes room for a vocal.
- 5-8 kHz – A lift here sharpens the attack. Cut it if the patch is mostly hiss and mechanical noise up top, or if it is crowding the cymbals.
Whatever the range, listen to the piano in the full mix, make one small move, then bypass the EQ and check that it actually helped.
In Conclusion
When EQ’ing any instrument, use your ears first and foremost. Instruments can play numerous roles within any track, and it’s important to listen to the song and judge for yourself what takes priority when carving out a space for an instrument with EQ.
Is the vocal the focus? Is the piano accompanying the bass or mid range? What’s the point of the instrument in this song? These are all some of the questions you should be asking yourself when using EQ. Best of luck out there!
Free Download: EQ Frequency Chart Poster
Every instrument’s frequency range on one colour-coded chart. Print it, pin it above your monitors, and stop guessing where to cut.

George Bell Edwards (IdleGod): Multi-Instrumentalist, Producer and Songwriter