
Master your understanding of compression settings:
Compression ratio sets how hard a compressor pushes back once your signal crosses the threshold. At 2:1, every 2 dB over the line comes out as 1 dB; at 10:1 you’re close to limiting. The right number depends on what you’re compressing, so this guide covers what the ratio does to the sound, how it interacts with threshold and knee, and the starting points that work for drums, vocals, bass, guitars and the mix bus.
What Is Compression Ratio?
The compression ratio dictates how much of the outputted signal is reduced. With a ratio of 2:1 for instance, every 2 dB that passes the threshold level is reduced by 1dB. Further to that, if 8dB passes the threshold then only 4 dB is output.
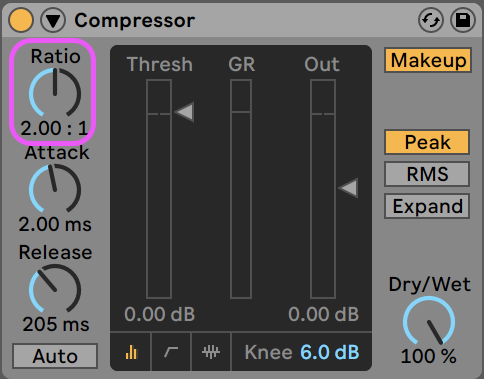
Getting the right ratio is crucial for creating natural dynamics. If for instance you’re placing a compressor on a mix bus you may want the ratio set low in order to gently squeeze the transients without squashing the mix.
On the other hand higher ratios are great for guitars and vocals where you want to close the gap between the loudest and quietest parts and create a wall of sound.
Free Download: EQ Frequency Chart Poster
Every instrument’s frequency range on one colour-coded chart. Print it, pin it above your monitors, and stop guessing where to cut.
How Does The Ratio Knob on A Compressor Work?
High compression ratios achieve more compression, while lower ratios output a signal with less compression. Neither of this would be possible without a knob that controls the threshold level. The threshold is the volume which the signal must exceed before compression kicks in.
For instance, if the compressor’s threshold is set to -10 dB then anything that passes this volume will be compressed at the rate determined by the ratio knob.
Essentially the ratio and threshold knobs cannot complete their functions without the other.
Ratio Levels Explained:
- 1:1 ratio – no compression takes place
- 2:1 ratio – every 2 dB past the threshold is reduced by 1 dB. Accordingly, 10 dB is reduced by 5 dB.
- 4:1 ratio – every 4 dB is compressed to 1 dB, 8 dB down to 2 db, and 16 dB to 4 dB.
- 10:1 ratio – 10 dB is compressed to 1 dB, 20 dB down to 2 Db. Very extreme levels of volume attenuation.
How Does Knee Affect The Ratio During Compression?
The knee setting dictates how aggressively the input signal triggers the compressor. A soft knee will gradually ease the compression in before the threshold is reached, making it sound more well rounded and natural.
Visually it will have a rounded edge:
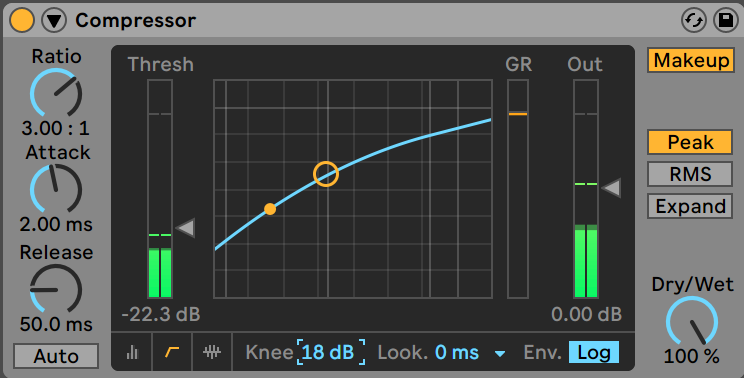
Essentially the compression will kick in a little before the threshold and the full ratio won’t be applied until a little after the threshold.
A hard knee will instantly compress as soon as the threshold is exceeded. It will look more severe:
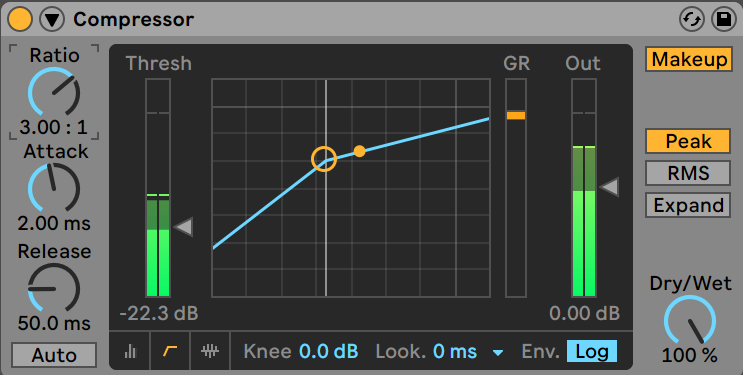
The compression doesn’t kick in until the threshold is reached, and full compression will occur at the point of the threshold.
Not all compressors have a knee parameter, so don’t be surprised if your favourite compression hardware is missing this particular knob.
Compressors with the knee function will either allow you to choose between a hard knee or a soft knee, or dial in a decibel level so you can find a blend of hard and soft of your choosing. 0 dB is a hard knee and any value above 0 starts softening the knee.
As a rule of thumb hard knees are suited for fast moving transients. Hi-hats, hip hop beats, lead guitar riffs and fast paced vocals all benefit form a hard knee.
Softer transients such as rhythm guitar, piano, and synth pads require a softer knee.
Sound Examples
For reference, here is a drum beat with a soft knee:
And here is a drum kit with a hard knee:
What Is The Maths Behind Compression Ratio?
The maths behind ratio compression is quite simple.
- 2:1 ratio compression will reduce everything by half:
- 2db reduced to 1db
- 6 db to 3 dB,
- 10 dB to 5 dB
- …and so on.
- 3:1 will reduce the outgoing signal to a third
- 3 dB reduced to 1dB
- 6 dB to 2dB
- 9 dB to 3 dB
- 4:1 will reduce the output signal to a quarter
- 4 dB reduced to 1dB
- 8 dB to 2 dB
- 12 dB to 3 dB
Sound Examples
For reference, here is a drum beat with a 2:1 ratio:
And here is a drum kit with a 10:1 ratio:
Tips For Setting Compression Ratio
The compression ratio is not just linked to the threshold, but also to your intention.
- Do you wish to sidechain your bass to the kick drum? Then it’s best for a inf:1 setting as the point of sidechaining your bass to the kick is to scoop out the initial hit of the bass frequencies to allow the kick to shine through.
- If you are simply taming transients on a mix bus, say for instance on a drum kit, then a ratio of 4:1 or 2:1 is preferable. The effect will be subtle as the output level won’t be so aggressively attenuated.
- Are your guitars sounding lifeless in parts and getting drowned by the track’s dynamics? Whack the ratio up to 10:1, with a slow attack that let’s the initial twang of your riffs through. Set a medium to slow release time (adjust to taste) to will create a wall of sound that brings your guitars front and centre. Then finally, pan off to the sides.
Ratio Starting Points By Source
These are starting points, not rules. Set the ratio first, then bring the threshold down (or, on a fixed-threshold design like an 1176, push the input gain up) until the gain-reduction meter shows the amount listed, and adjust from there by ear.
| Source | Ratio | Aim for (gain reduction) |
|---|---|---|
| Mix bus | 1.5:1 to 2:1 | 1 to 2 dB |
| Drum bus | 2:1 to 4:1 | 2 to 4 dB |
| Kick and snare | 4:1 to 6:1 | 4 to 8 dB |
| Lead vocal | 3:1 to 4:1 (6:1 for rap or aggressive delivery) | 3 to 6 dB |
| Bass | 4:1 | 3 to 6 dB |
| Acoustic guitar | 2:1 to 3:1 | 2 to 4 dB |
| Clean electric rhythm guitar | 3:1 to 4:1 | 3 to 5 dB |
| Distorted rhythm guitar | 2:1 or none | 0 to 2 dB (the amp already compressed it) |
| Synth pads | 2:1 | 1 to 3 dB |
| Sidechain ducking | 4:1 for a subtle dip, up to inf:1 for hard pumping | as much as the groove needs |
How To Set compression Ratio Perfect Every Time
Since the ratio affects how much your audio will be compressed, it’s worth testing out what different ratios sound like. Here is an example of a 2:1 ratio on a master bus:
As you can hear, the compression is subtle and natural sounding.
Let’s increase things to 4:1.
This still sounds ok but the guitar is becoming a bit more prominent in the mix at the expense of the drums.
Now let’s whack it up to 10:1.
As you can see, the glued sound of the 2:1 ratio has been lost and now we are starting to hear audible distortion from too much compression. It’s a good idea to start at this level and dial it back until it begins sounding more natural.
A Brief Overview of Compression Settings
Here’s a quick overview of all the compressor settings:
- Attack & Release – attack time is how fast the compression occurs, dictated in milliseconds or seconds, and release time is how long it takes to relinquish the compression.
- Makeup Gain – after the the compressor does its thing you can then increase the overall volume using the makeup gain
- Ratio – how much gain reduction is applied once the signal passes the threshold.
- Threshold – the volume the signal must pass before compressor kicks in.
- Dry/Wet – also known as ‘Mix’, this option lets you blend the dry and wet signal (with compression and without compression) in order to achieve a more natural sounding output.
Free Download: EQ Frequency Chart Poster
Every instrument’s frequency range on one colour-coded chart. Print it, pin it above your monitors, and stop guessing where to cut.

Gareth is a freelance producer and sound designer from Dublin, based in Southeast London. After completing his Bachelor of Arts in Music Production at Leeds Beckett University, he worked as a tutor at the Royal Arsenal School of Music before embarking on a career in film and podcasts. He specialises in mixing and song composition and is a regular on the London DIY scene, where he performs as Gareth Freiheit.