
Master your understanding of compression settings:
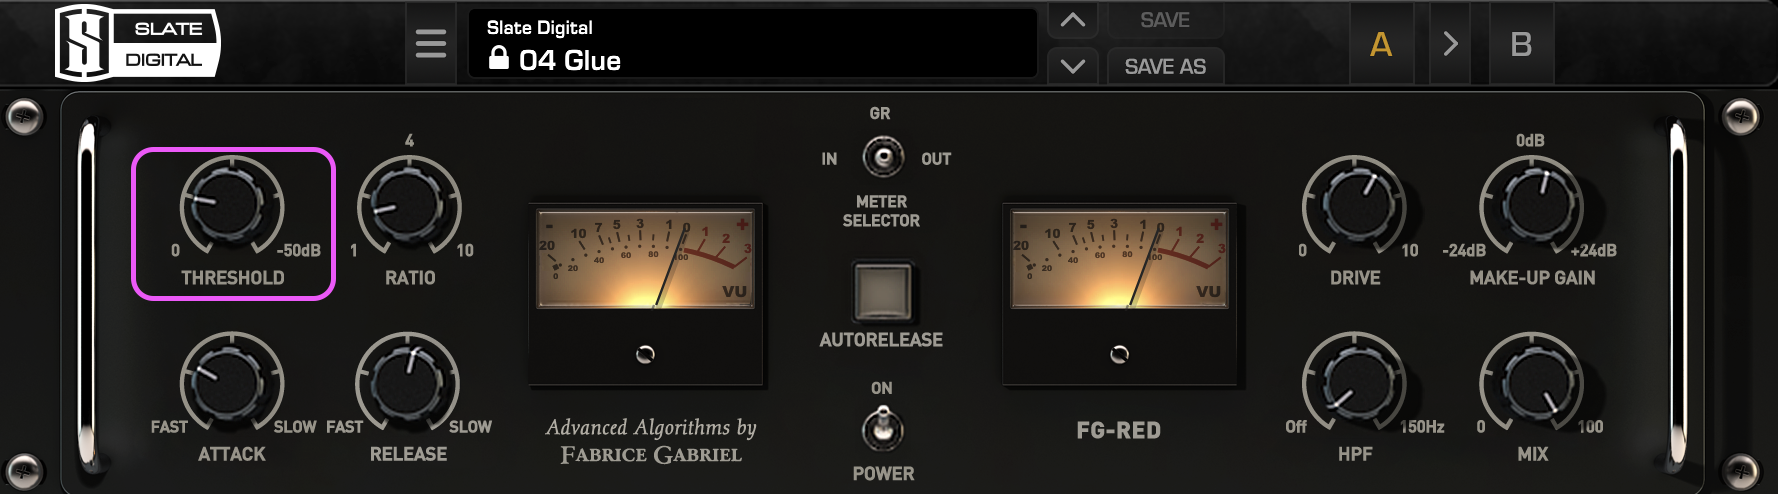
A compressor is at its core simply volume attenuation. The compression threshold controls how much compression happens. Every time the input signal level exceeds the threshold there is a gain reduction, (depending on the chosen ratio), and the way in which this decrease occurs is dictated by the compressor parameters.
In short, the compressor threshold is the volume that your audio signal must exceed before the compressor begins to do its job. It will idly sit by until the designated dB is breached, whereupon it jumps into action and applies all the other parameters that your compressor has been set to.
If you have a set threshold of -10dB then everything below this level is unaffected, and anything that passes that amplitude is compressed.
Furthermore, if no ratio is selected and your ratio is 1:1, the audio will not compress. You need to learn about compression ratio before setting the threshold.
Where Should I Set My Compressor Threshold?
There is no set level for the threshold. It is very much a case of what your personal preference is, coupled with what the style of the song requires. Additionally, it is dependent on the gain structure of your audio, so there is no one size fits all threshold level.
For instance, in electronic music and rock you may want a lower threshold, so the compressor works on a wider range of the signal.
That way you can tame many of the signal peaks in a busy arrangement. But a folk song with a sparse arrangement might want a higher threshold, so only the loudest moments get touched and the subtleties of the dynamic range come through.
Additionally, it depends on the gain of your audio. If your audio is extremely low in volume, you will need to set your threshold differently to another piece of audio that has a high volume. Threshold is simply the dB level at which the compressor will work on.
Main Controls Needed For Threshold To Work
Something that is very closely tied to the threshold is the compressor’s ratio. The two work as a pair: with the ratio at 1:1, no threshold setting will produce any compression.
At 2:1 then an input signal exceeding the threshold by 4dB will be reduced by 2db. A 1:1 ratio means no reduction occurs. Therefore, without a set ratio exceeding 1:1 no more compression will take place.
Makeup gain allows you to boost the output signal to compensate for the loss in volume. This means that the quieter parts are louder and the loudest parts are quieter – voila, the signal’s dynamic range has been reduced.
Free Download: EQ Frequency Chart Poster
Every instrument’s frequency range on one colour-coded chart. Print it, pin it above your monitors, and stop guessing where to cut.
How To Set The Threshold In Practice
The threshold value on its own tells you very little, because what it does depends on how loud the signal going into the compressor is. A vocal recorded hot (with a high input level) might need a threshold of -18 dB to get the same result a quieter take gets at -30 dB. So don’t set the threshold to a number you read somewhere. Set it to a result, and read the result off the gain-reduction meter, then confirm it with your ears.
- Decide what the compressor is for. Catching peaks (a few loud moments that jump out) and leveling (evening out a whole performance) are different jobs, and they want different threshold settings. Pick a ratio to match: 2:1 to 4:1 for gentle leveling, 4:1 to 8:1 for peak control on a vocal or bass.
- For peak control, bring the threshold down until the meter moves on the loud parts only. On a vocal, that’s roughly 3 to 6 dB of gain reduction on the loudest phrases and little or nothing on the quiet ones. For leveling, go lower, so the compressor stays gently active through the quieter passages too, at a lower ratio. (On a fixed-threshold design like an 1176 there is no threshold knob; you push the input gain up instead, which drives more of the signal past the fixed point.)
- Listen for pumping, the level audibly rising and falling in time with the beat. It can come from the threshold, the ratio, the attack and release times, or heavy low end hitting the detector. Try raising the threshold or lowering the ratio first. If the timing is causing it, adjust the release until the movement settles. Sometimes pumping is the sound you want, in which case leave it.
- Add makeup gain last, so the compressed signal sits at the same loudness as the uncompressed one. Then bypass the compressor and compare. In a quick A/B the louder version almost always sounds better, which is exactly why you match loudness before judging.
Threshold Starting Points By Source
Because the threshold value depends on your gain staging, the useful target is the gain reduction it produces, not the dB figure on the knob. These are starting points to adjust by ear, and some sources need less than this or none at all.
| Source | Ratio to pair with | Gain reduction to aim for |
|---|---|---|
| Lead vocal | 3:1 to 4:1 | 3 to 6 dB on the loudest phrases |
| Kick and snare | 4:1 to 6:1 | 3 to 6 dB on the hits |
| Drum bus | 2:1 to 4:1 | 2 to 4 dB |
| Bass | 4:1 | 3 to 6 dB, usually steady rather than bouncing |
| Acoustic guitar | 2:1 to 3:1 | 2 to 4 dB on strums |
| Synth pads | 2:1 | 1 to 3 dB, or none |
| Mix bus | 1.5:1 to 2:1 | 1 to 2 dB, just touching |
Three Common Threshold Mistakes
Chasing a number you read somewhere. “Set the threshold to -20 dB” only worked on the signal the writer had in front of them. Your take is louder or quieter, so the same number gives a different amount of compression. Read the meter, not the recipe.
Using one threshold for the whole song. A vocal that sits right in the verse will hit the compressor much harder in the chorus, because the singer is louder there. Either automate the threshold (or the input gain in front of the compressor) between sections, or even out the clip gain first so the compressor sees a steadier level.
Asking one compressor to do two jobs. If you need both peak control and overall leveling, one compressor with a low threshold and a high ratio tends to squash everything at once. Two stages usually sound more natural: a fast compressor with a higher threshold that only touches the peaks, then a slow, gentle one with a lower threshold for the overall level, each doing a little.
Other Audio Effects That Use Threshold Control
Gate
A noise gate will remove any audio that passes the threshold. It operates much like a gate that is closed, blocking anything from passing through. For instance, at -20dB, anything that falls below this is completely silenced.
Expander
This tool increases the dynamic range (difference between the loudest and quietest parts . It works in much the same way that a noise gate operates, in that it removes audio depending on what dB the threshold is set to.
Rather than completely shutting the volume off once it passes the threshold, it has a more natural fading effect.
Limiter
Essentially a compressor that applies a brick wall compression (ratio of 10:1 or higher to audio signals in order to increase perceived loudness.
A Brief Overview of Compression Settings
Here’s a quick overview of all the compressor settings:
- Attack & Release – attack time is how fast the compression occurs, dictated in milliseconds or seconds, and release time is how long it takes to relinquish the compression.
- Makeup Gain – after the compressor does its thing you can then increase the overall volume using the makeup gain
- Ratio – how much gain reduction is applied once the signal passes the threshold.
- Threshold – the volume the signal must pass before compressor kicks in.
- Dry/Wet – also known as ‘Mix’, this option lets you blend the dry and wet signal (with compression and without compression) in order to achieve a more natural sounding output.
Free Download: EQ Frequency Chart Poster
Every instrument’s frequency range on one colour-coded chart. Print it, pin it above your monitors, and stop guessing where to cut.

Gareth is a freelance producer and sound designer from Dublin, based in Southeast London. After completing his Bachelor of Arts in Music Production at Leeds Beckett University, he worked as a tutor at the Royal Arsenal School of Music before embarking on a career in film and podcasts. He specialises in mixing and song composition and is a regular on the London DIY scene, where he performs as Gareth Freiheit.