
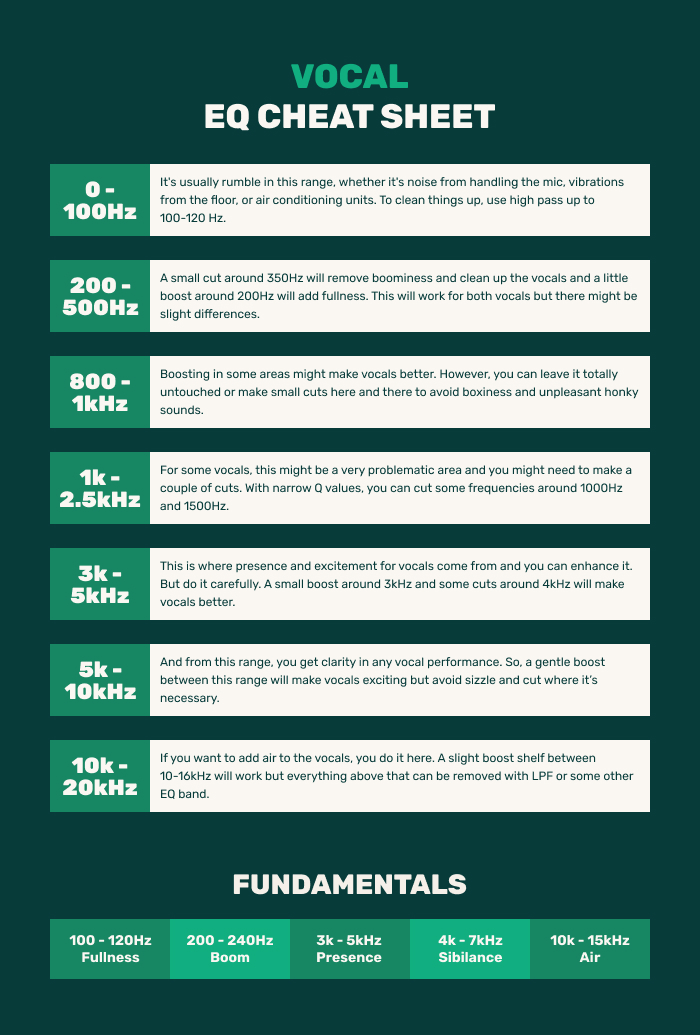
Una guía rápida de EQ vocal es la forma más rápida de saber dónde buscar. Te indica el rango de frecuencia general de una voz y qué áreas suelen necesitar atención.
Cada cantante y cada toma es diferente, así que trata los rangos de abajo como un punto de partida en lugar de un conjunto de reglas. Debajo del gráfico está el proceso de seis pasos que uso para ecualizar una voz de principio a fin, y puedes seguirlo en cualquier mezcla vocal.
Frecuencias Vocales
Esto funciona para voces masculinas y femeninas y te da los rangos que valen la pena revisar. Lo que cada una necesita depende del cantante, el micrófono y la sala, así que escucha antes de tocar cualquier cosa.
- 0-100 Hz – El ruido de manejo, retumbos del suelo y aire acondicionado viven aquí abajo, y la mayoría de las voces no. Un pase-alto alrededor de 80 Hz es un punto de partida común. Súbelo o bájalo mientras escuchas y detente antes de que la voz empiece a perder cuerpo, porque una voz masculina grave puede tener fundamentales en esta región y un filtro pronunciado la adelgazará.
- 200-500 Hz – El cuerpo y el retumbo comparten este rango. Un corte pequeño alrededor de 350 Hz puede limpiar una voz retumbante, y un realce suave alrededor de 200 Hz puede añadir plenitud a una delgada.
- 800 Hz-1 kHz – Donde una voz se vuelve empastada o nasal. Barre un corte estrecho si el tono suena gangoso, pero muchas voces no necesitan nada aquí.
- 1-2.5 kHz – Algunas voces se endurecen alrededor de 1.5 kHz. Cuando eso ocurre, un corte estrecho lo soluciona más rápido que cualquier otra cosa.
- 3-5 kHz – Presencia. Un pequeño realce alrededor de 3 kHz puede traer una voz hacia adelante, y una reducción alrededor de 4 kHz puede suavizar una que ya está demasiado al frente. Muchas voces llegan con suficiente de ambas.
- 5-10 kHz – Claridad y consonantes. Un realce suave aquí hace una voz más emocionante, pero aquí también vive la sibilancia, así que escucha que los sonidos de S no se vuelvan cortantes.
- 10-20 kHz – Aire. Una ligera plataforma entre 10 y 16 kHz suele ser todo lo necesario. Si hay siseo o ruido por encima, un filtro pase-bajo u otra banda de EQ se encargará de ello, pero no quites la parte superior de una grabación limpia solo porque puedas.
Cómo Ecualizar Voces en Seis Pasos
El gráfico te indica dónde buscar. Este es el orden en que trabajo, y importa más que cualquier ajuste individual. El EQ no es una herramienta de rescate: si la grabación es mala, ninguna cantidad de ecualización arreglará la toma. Consigue que la interpretación esté bien y el EQ la mejorará.
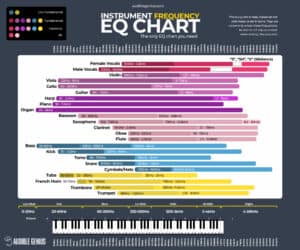
Descarga Gratuita: Póster con Tabla de Frecuencias EQ
El rango de frecuencias de cada instrumento en una tabla codificada por colores. Imprímela, pégala sobre tus monitores y deja de adivinar dónde cortar.
1. Limpia la voz con un filtro pase-alto
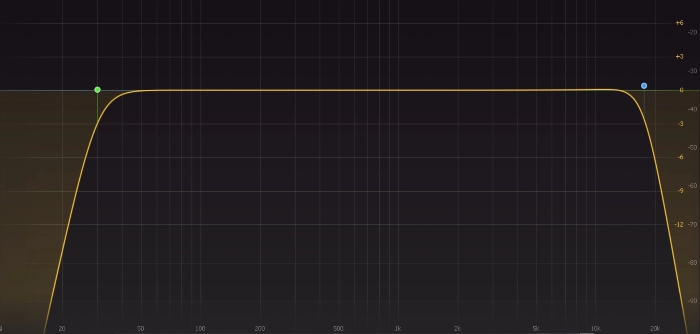
La mayoría de las tomas tienen contenido en los graves extremos que la voz no necesita. Inserta un EQ en la pista principal, ajusta un pase-alto y súbelo hasta que empieces a oír que la voz cambia, luego retrocede.
Un pase-bajo es una decisión diferente. Úsalo cuando haya siseo, zumbido del aire acondicionado o ruido de amplificador en la parte superior, no por rutina, porque una grabación limpia normalmente quiere que se deje intacto el extremo agudo.
Cualquier EQ decente hará esto. El objetivo es eliminar lo que no es la voz y conservar todo lo que sí lo es, así que corta menos de lo que crees necesario. Algunos plugins te permiten escuchar la parte que estás eliminando, lo que deja claro cuándo te has pasado.
2. Corta las frecuencias problemáticas
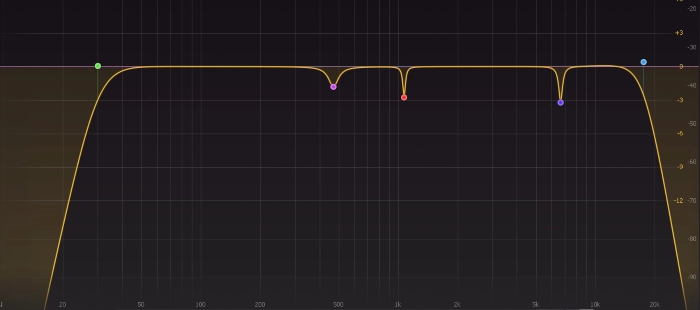
Los filtros limpian los extremos. Lo que queda son los puntos individuales dentro de la voz que resuenan, suenan nasal o pican, normalmente en algún lugar de los medios graves, medios o medios agudos.
Para encontrarlos, crea una banda estrecha, auméntala 5 o 6 dB y barre lentamente el espectro. Un barrido aumentado exagera todo, así que una vez que creas haber encontrado algo, baja el aumento a lo normal y decide a un nivel sensato y en la mezcla completa en lugar de en solo.
Luego convierte ese aumento en un corte y mantén la Q estrecha. La mayoría de las veces una pequeña cantidad es suficiente, aunque una resonancia realmente desagradable puede necesitar mucho. 400-500 Hz, 1 kHz y 7 kHz son lugares comunes donde encontrar problemas, pero son lugares para revisar, no una lista para trabajar punto por punto. Si te encuentras acumulando cortes porque fuiste a buscarlos, detente y escucha la voz sin ninguno de ellos.
3. Aumenta las frecuencias buenas
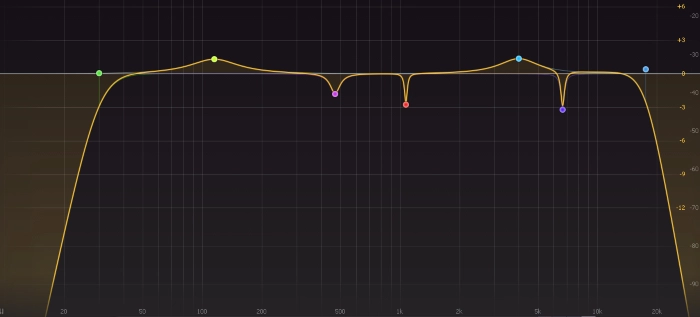
Ahora barre de nuevo, esta vez buscando lo que quieres más. Piensa en lo que le falta a la voz en lugar de en un objetivo: 100-120 Hz es donde vive la plenitud, aunque también es donde está el retumbo. 3-5 kHz es presencia, y una voz que ya está adelantada no te agradecerá más. 10-15 kHz es aire, cuando hay aire que encontrar y no solo siseo.
Una buena configuración por defecto es cortar estrecho y aumentar amplio, ya que un realce amplio mantiene la voz sonando como una voz en lugar de como un ajuste. Y si la toma ya tiene el carácter que quieres, el número correcto de aumentos es ninguno. Iguala el nivel con la señal sin procesar antes de decidir, porque un aumento también es un incremento de volumen, y más alto siempre suena mejor durante los primeros segundos.
4. Ecualiza el doblaje vocal
Un doblaje es una segunda toma de la misma parte, cantada de nuevo y grabada por separado en lugar de copiada. Muchas voces excelentes son de una sola pista, así que esto es una elección en lugar de un paso, pero cuando quieres que un estribillo se abra es la forma habitual de hacerlo.
Ecualízalo después de la pista principal, de la misma manera: filtro, luego cortes, luego aumentos. No copies el EQ de la voz principal sobre él. Incluso un cantante con oído perfecto no entregará una toma idéntica, y la distancia, el ángulo y la dinámica cambian con ella, así que los puntos problemáticos aparecen en otro lugar. Mantén la pista principal sonando mientras trabajas en el doblaje.
5. Mezcla la pista principal con el doblaje
La mezcla comienza con los faders, y la mayor parte del trabajo se hace ahí. El timing, la afinación, el paneo y la compresión también mueven la mezcla, pero recurre a ellos después del nivel, no en lugar de él.
Esto supone que ya hiciste tu ajuste de ganancia, así que los niveles están más o menos ahí. Dónde coloques el doblaje decide para qué sirve: cerca detrás de la pista principal y el par se lee como una voz más grande, más abajo y simplemente añade peso que el oyente nunca oye conscientemente. Ambos son válidos. Lo que no quieres es un doblaje lo suficientemente alto como para mover el nivel general de la voz.
6. Ecualiza y mezcla el resto de las voces
Los coros y armonías suelen ser lo último que hago con las voces, y normalmente van rápido. Elimina el barro y la aspereza y sigue adelante, aunque si una de ellas tiene una resonancia tan mala como cualquiera en la pista principal, trátala adecuadamente.
La mezcla es la parte interesante, porque decide para qué sirven estas pistas. Súbelas y se convierten en parte del gancho. Bájalas y simplemente hacen que la pista principal se sienta más grande sin que el oyente note por qué. Si no estás seguro de qué quieres, encuentra una canción con armonías que te gusten y copia el balance.
Conclusión
Usa la tabla para saber dónde buscar y los seis pasos para saber en qué orden trabajar. Ambos son un punto de partida. Cada voz es diferente, y los trucos que desarrolles para los cantantes con los que trabajas regularmente superarán cualquier guía general, incluida esta. Para los otros instrumentos en la mezcla, nuestro Guía rápida de EQ los reúne en una sola tabla.
Descarga Gratuita: Póster con Tabla de Frecuencias EQ
El rango de frecuencias de cada instrumento en una tabla codificada por colores. Imprímela, pégala sobre tus monitores y deja de adivinar dónde cortar.

Lasha es guitarrista con más de 18 años de experiencia. Empezó en bandas locales, aprendió a grabar de forma autodidacta en 2010 y comenzó a grabar sus propias maquetas. Escribe sobre producción musical desde 2016, más recientemente en ApartmentRecording.com, donde trata técnicas de grabación y mezcla para guitarra, bajo y batería.